Powerbox Core radio and set up thread.


 11-18-2019, 11:36 AM
#202
under the following you can see in the video the CORE flameout warning with one of our ECU data converters.
It´s a no brainer.
BR
Dirk
CB Elektronics
11-19-2019, 09:36 AM
#203


On my DX-20 I can use the little 2 position trimmer buttons to trim the nose wheel steering on the fly. It's handy, you don't have to pull up sub-trim to do taxi tests.
I was setting up my CORE on a small Harlock turbine Viper and was thinking how to accomplish this since they don't have that two way switch on the Core (or so I thought). The easy answer is the rotary knob but I don't want it getting changed by bumping or using it on another model and having to re-trim each time.
After a bit of tinkering this is what I discovered:
In the SERVO menu I added a servo (7 in this case) and labeled it Nose Steering. I left the throw at the default for now.
In the FUNCTION menu I set the control to ST-B.
Now the cool part, and the reason for this post.
Select Trim
Select Control
Click the momentary button to the upper left of the throttle stick. (Or the momentary button next to the power switch, either will work)
That enables both opposing buttons for trimming the nose wheel steering!
I set the trim step to 1% for the finest control possible.
Voila! I can now set nose steering without playing with menus during taxi tests. I didn't realize those buttons could be setup as a left/right pair. Nice job Power Box!!
Last edited by BarracudaHockey; 11-19-2019 at 09:40 AM.
The following users liked this post:
flyalan (01-28-2024)
 11-19-2019, 10:23 AM
#205
On my DX-20 I can use the little 2 position trimmer buttons to trim the nose wheel steering on the fly. It's handy, you don't have to pull up sub-trim to do taxi tests.
I was setting up my CORE on a small Harlock turbine Viper and was thinking how to accomplish this since they don't have that two way switch on the Core (or so I thought). The easy answer is the rotary knob but I don't want it getting changed by bumping or using it on another model and having to re-trim each time.
After a bit of tinkering this is what I discovered:
In the SERVO menu I added a servo (7 in this case) and labeled it Nose Steering. I left the throw at the default for now.
In the FUNCTION menu I set the control to ST-B.
Now the cool part, and the reason for this post.
Select Trim
Select Control
Click the momentary button to the upper left of the throttle stick. (Or the momentary button next to the power switch, either will work)
That enables both opposing buttons for trimming the nose wheel steering!
I set the trim step to 1% for the finest control possible.
Voila! I can now set nose steering without playing with menus during taxi tests. I didn't realize those buttons could be setup as a left/right pair. Nice job Power Box!!
I was setting up my CORE on a small Harlock turbine Viper and was thinking how to accomplish this since they don't have that two way switch on the Core (or so I thought). The easy answer is the rotary knob but I don't want it getting changed by bumping or using it on another model and having to re-trim each time.
After a bit of tinkering this is what I discovered:
In the SERVO menu I added a servo (7 in this case) and labeled it Nose Steering. I left the throw at the default for now.
In the FUNCTION menu I set the control to ST-B.
Now the cool part, and the reason for this post.
Select Trim
Select Control
Click the momentary button to the upper left of the throttle stick. (Or the momentary button next to the power switch, either will work)
That enables both opposing buttons for trimming the nose wheel steering!
I set the trim step to 1% for the finest control possible.
Voila! I can now set nose steering without playing with menus during taxi tests. I didn't realize those buttons could be setup as a left/right pair. Nice job Power Box!!
 11-19-2019, 11:47 AM
#207

Thread Starter
I’ve flown loads of jets that need trimming in yaw! Normally it’s the tailpipe install, but there are other factors too.
i don’t ever have nose wheel trimming either, I tend to set it to run straight from new and any change means something slipped or is wearing out!
i don’t ever have nose wheel trimming either, I tend to set it to run straight from new and any change means something slipped or is wearing out!
11-19-2019, 01:37 PM
#209


Join Date: Jun 2006
Location: Gold Coast, Queensland, AUSTRALIA
Posts: 1,469
Received 26 Likes
on
24 Posts
A separate nose wheel trim is essential and it would be nice if PB could have given us a central rotary pot like we have on the Futaba 18MZ. This pot is not affected by switching models.
JanR
JanR
11-21-2019, 06:16 AM
#210
If you need constant adjustment then you have a more fundamental problem.
Rudder trim CAN be very useful for any jet showing slight roll out of trim which is different inverted or upright. After checking weight balance, a small RUDDER adjustment can often effect a cure.
Even Boeing recommends using (upright!) a small amount of rudder to correct slight roll trims to centralise the control wheel. As well as avoiding spoiler uplift it , apparently, is more efficient, or so they told me !

The following users liked this post:
miksterr (04-27-2020)
11-21-2019, 03:43 PM
#214
Thread Starter
It amazes me you guys never get a cross wind or even 180 swing during a flight. We get all of that here, rudder stick works great rather than constant trimming.
11-22-2019, 02:19 PM
#215
Join Date: Jun 2006
Location: Gold Coast, Queensland, AUSTRALIA
Posts: 1,469
Received 26 Likes
on
24 Posts
I disagree, a trim function for nosewheel steering is not ESSENTIAL l, have never used it on any jet. That said, the Core offers plenty of opportunity to do an initial setup of NS tracking using an assigned trim, lever or side pushbuttons, then set the value of offset into the function assigned for the NS and then leave it. Job done.
If you need constant adjustment then you have a more fundamental problem.
Rudder trim CAN be very useful for any jet showing slight roll out of trim which is different inverted or upright. After checking weight balance, a small RUDDER adjustment can often effect a cure.
Even Boeing recommends using (upright!) a small amount of rudder to correct slight roll trims to centralise the control wheel. As well as avoiding spoiler uplift it , apparently, is more efficient, or so they told me !
JanR
The following users liked this post:
miksterr (04-27-2020)
11-28-2019, 11:39 AM
#216
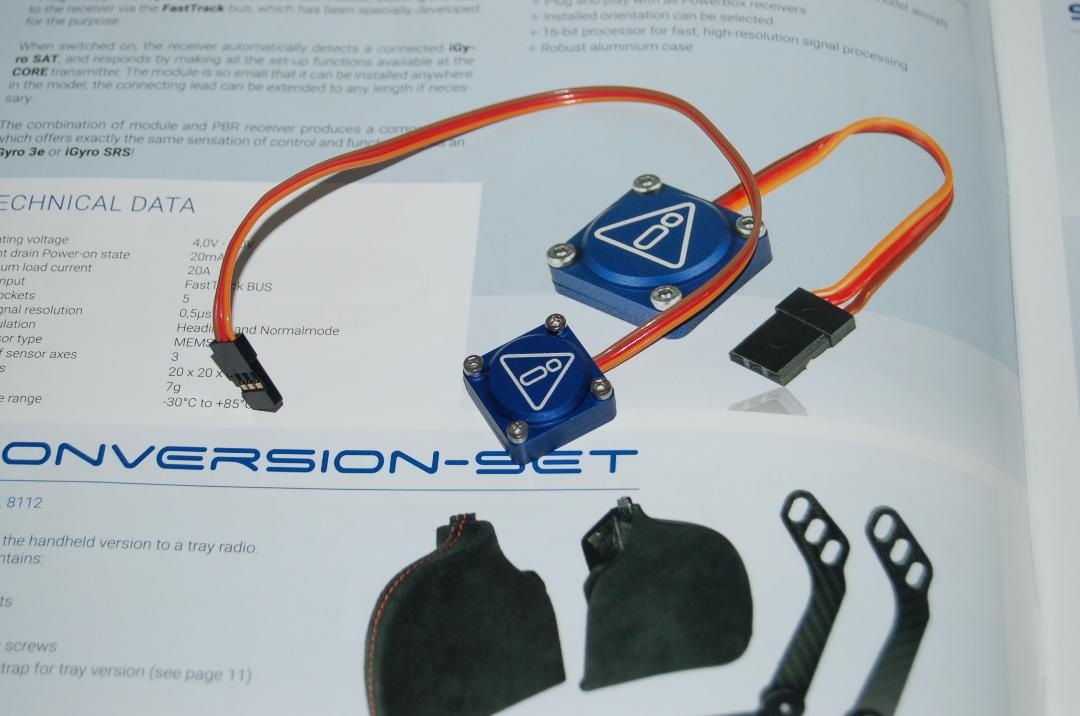
The isat gyro and pressure sensors are now available for use with the Core and the pressure sensor with other radios.
The tiny gyro is incredibly capable for a unit of any size, let alone one so small, in fact tiny.
The pressure sensor works at upto 16 bar, 240 psi, and can be used to trigger an alarm when pressure falls to a preset value, or, in fact, to initiate gear extension !
Very nice units indeed.
The tiny gyro is incredibly capable for a unit of any size, let alone one so small, in fact tiny.
The pressure sensor works at upto 16 bar, 240 psi, and can be used to trigger an alarm when pressure falls to a preset value, or, in fact, to initiate gear extension !
Very nice units indeed.
11-29-2019, 12:04 AM
#218
12-17-2019, 09:13 AM
#220
Thread Starter
The latest update for the Competition SRS and Cockpit SRS is available with immediate effect.
This update enables all telemetry data to be transmitted to the PowerBox CORE transmitter. However, a particular highlight is the new algorithm for switching receivers: It allows the iGyro SAT to be used with the receiver (PBR-7S, PBR-9D, PBR-26D) which is connected to RX2. This gives you an absolutely top-class gyro system with very little effort! All aspects of configuring and setting up the iGyro SAT are carried out directly at the transmitter.
latest update just released
 12-19-2019, 06:39 AM
#222
Senior Member
12-23-2019, 01:24 AM
#224
Thread Starter
The incredibly small iGyro SAT has been going out for a little over a week, plugging directly into some of the Rx’s it gives full iGyro options set from the Core Tx.