


New BJ Craft Andrew Jesky Designed 2016 Nats winner Element thread

 04-26-2020, 05:50 PM
#56
Junior Member
Join Date: Apr 2020
Posts: 3
Likes: 0
Received 0 Likes
on
0 Posts
Hi Everyone
This is my first post here so please be easy on me lol as I have some questions I am hoping you experienced pilots with the BJ Element can help me with.
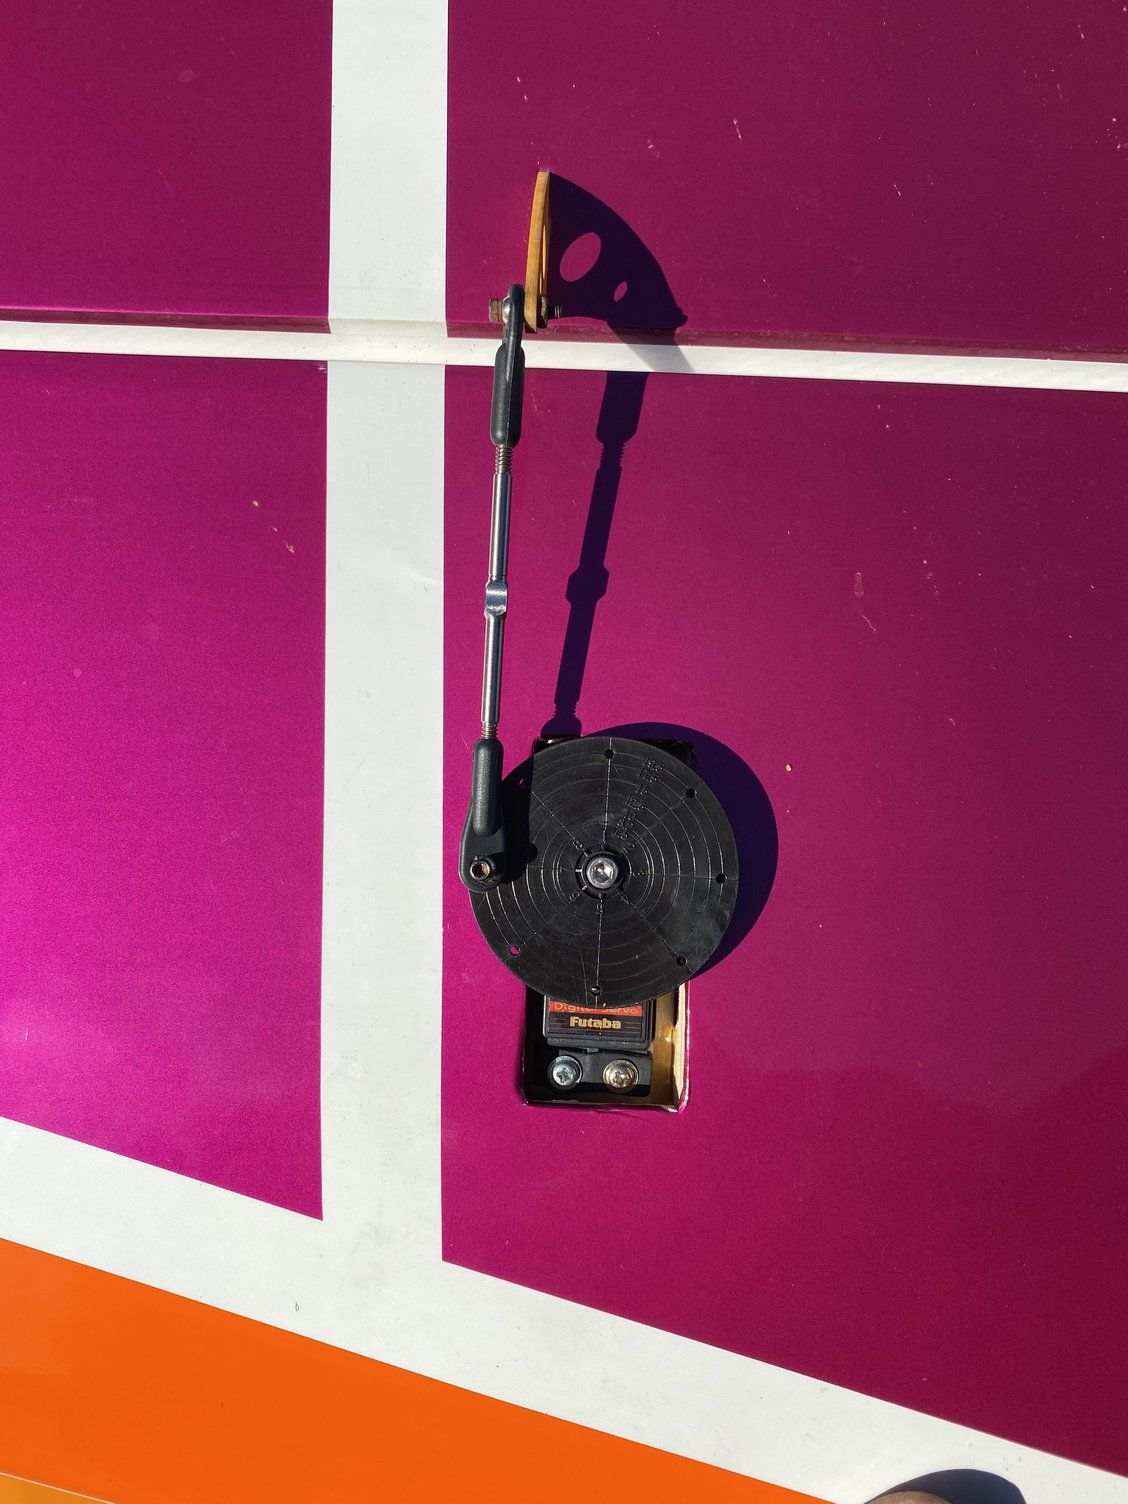
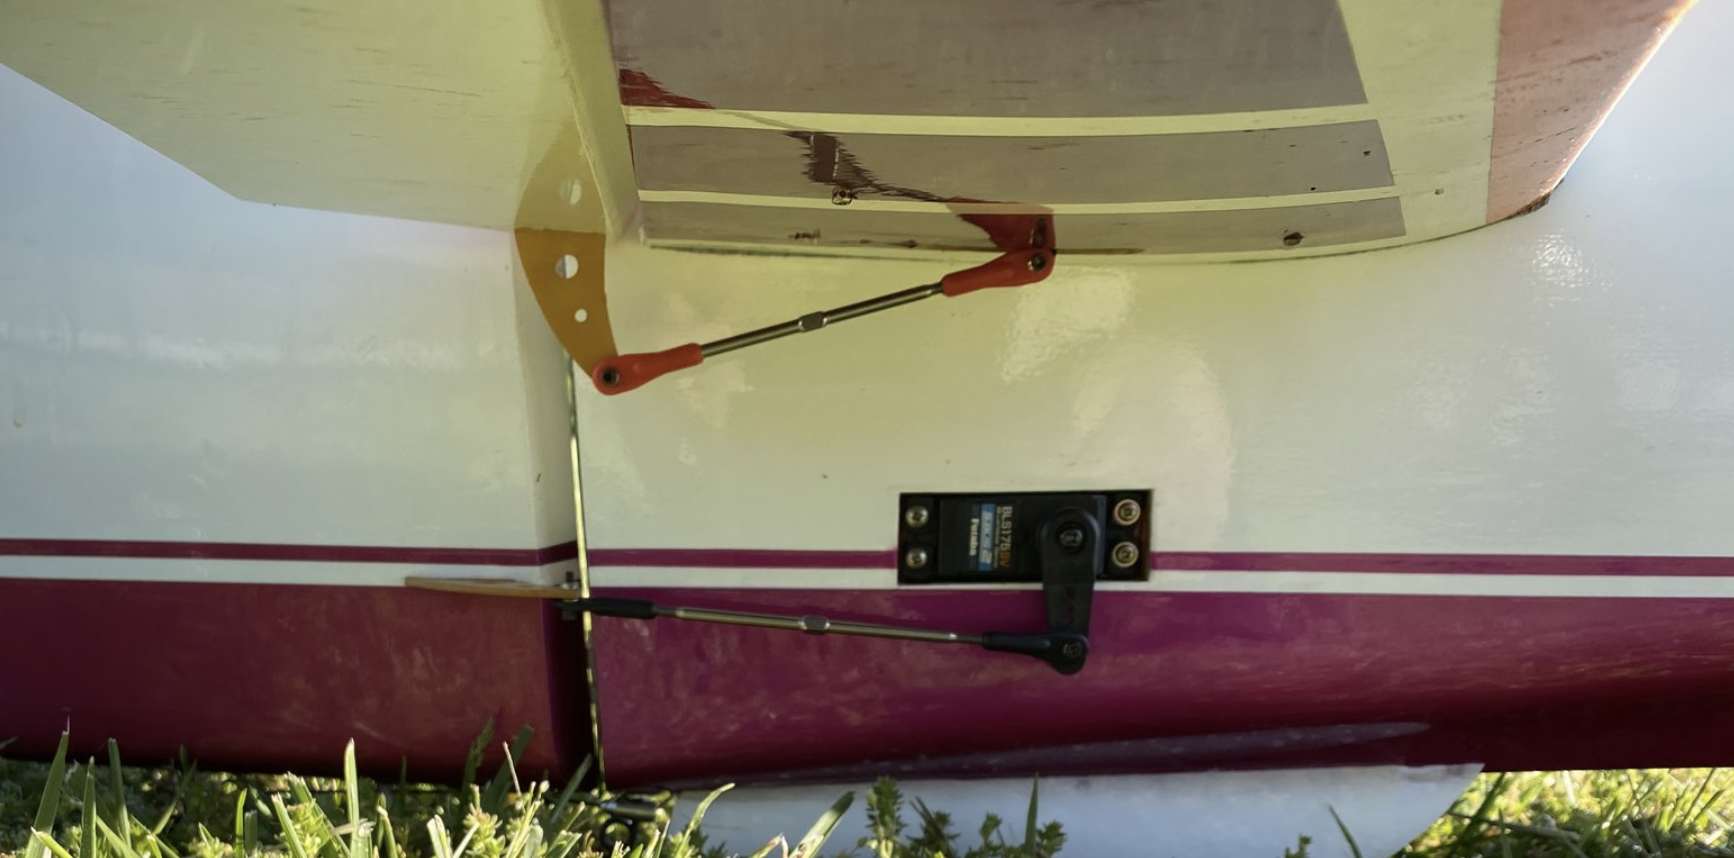
I have just purchased a used Element to replace my 14 year old Oxai Infinity that was converted to electric as this has got me from Sportsman, Advanced and Expert in 2 years so was now time to upgrade the plane for the F3a class. The guy selling it was experienced and said it did not suit his flying style hence the sale. I was really happy with my purchase as it was fitted out with the OS overrun motor, 3 blade Falcon prop, Futaba Bls servos, Futaba 100a esc. I was itching to get it in the air. The first flight was terrible and were my problems began, it was tail heavy and wanted to stall way too easy CG was 1/4" behind the wing tube the top wing pointing down towards the wing. The plane would not fly a straight line and every time you exit a loop etc. it was a lottery as to which direction the plane would head off in. I added 240grams of lead in the nose and this helped tracking but did not fix the issue completely. There was so much mixing and flight conditions as I had his radio set up also that I did not know where to start to rectify this so decided to start from a blank set up. Anyway 2 weeks on I have a new set up, I have moved the rudder servo from the rear and placed in down low by the undercarriage box and run cables back to the rudder, I cut out the battery tray and moved forward and dropped it also so I can now get the batteries under the motor and I have also moved the rx battery and placed it under the esc plywood plate in the nose. So I now have the CG in front of the wing tube the plane flys better and feels more locked in, stalls great, exits spins and snaps beautifully, flares for landing with ease but I still cannot get it to exit radius manoeuvres without it heading somewhere ??? with the OS motor it has really soft silicon tube on the rear mount so I changed this for Tygon fuel tubing and this has helped a lot. It seems there is little info on the plane regarding set up and no instruction manual that I can find apart from pictures, the BJ Craft website says manual coming soon.
My set up,
Ailerons 8 degrees normal flight snap rate 10degrees 55% expo
Elevators 17degrees this was found by flying the at approx 60 degree bank and pulling ever tighter circles until plane stalled which was at the end on the tx stick travel. 30% expo
Rudder down to 55% travel and 60% expo for flying and a logic set for 100 rudder for stall turns and snaps. Rudder is so powerful compared to my old plane lol.
Wings set to 0.65 incidence, top wing the same 0.65 with tail at 0.0 degrees.
Motor trust as required to trim model flight for upline and knife edge.
Mixing only 3% down elevator at low throttle for down line as I fly hands off level. And still experimenting with knife edge at about 4% down elevator for left and right rudder as model plus toward the canopy also moving CG to help this.
So my questions are
What length servo arms are people using on Rudder and Ailerons
How many degrees of deflection being used for each surface, Ailerons, Elevator, Rudder
How much expo are you using especially on rudder as this seem super sensitive.
Has anyone changed the setting in the bls servos ?? on rudder I'm running bls272.
Any help would be gratefully appreciated as read of heaps of people that loving this plane but at the moment im not feeling it.
Sorry for the long post.
Wayne
This is my first post here so please be easy on me lol as I have some questions I am hoping you experienced pilots with the BJ Element can help me with.
I have just purchased a used Element to replace my 14 year old Oxai Infinity that was converted to electric as this has got me from Sportsman, Advanced and Expert in 2 years so was now time to upgrade the plane for the F3a class. The guy selling it was experienced and said it did not suit his flying style hence the sale. I was really happy with my purchase as it was fitted out with the OS overrun motor, 3 blade Falcon prop, Futaba Bls servos, Futaba 100a esc. I was itching to get it in the air. The first flight was terrible and were my problems began, it was tail heavy and wanted to stall way too easy CG was 1/4" behind the wing tube the top wing pointing down towards the wing. The plane would not fly a straight line and every time you exit a loop etc. it was a lottery as to which direction the plane would head off in. I added 240grams of lead in the nose and this helped tracking but did not fix the issue completely. There was so much mixing and flight conditions as I had his radio set up also that I did not know where to start to rectify this so decided to start from a blank set up. Anyway 2 weeks on I have a new set up, I have moved the rudder servo from the rear and placed in down low by the undercarriage box and run cables back to the rudder, I cut out the battery tray and moved forward and dropped it also so I can now get the batteries under the motor and I have also moved the rx battery and placed it under the esc plywood plate in the nose. So I now have the CG in front of the wing tube the plane flys better and feels more locked in, stalls great, exits spins and snaps beautifully, flares for landing with ease but I still cannot get it to exit radius manoeuvres without it heading somewhere ??? with the OS motor it has really soft silicon tube on the rear mount so I changed this for Tygon fuel tubing and this has helped a lot. It seems there is little info on the plane regarding set up and no instruction manual that I can find apart from pictures, the BJ Craft website says manual coming soon.
My set up,
Ailerons 8 degrees normal flight snap rate 10degrees 55% expo
Elevators 17degrees this was found by flying the at approx 60 degree bank and pulling ever tighter circles until plane stalled which was at the end on the tx stick travel. 30% expo
Rudder down to 55% travel and 60% expo for flying and a logic set for 100 rudder for stall turns and snaps. Rudder is so powerful compared to my old plane lol.
Wings set to 0.65 incidence, top wing the same 0.65 with tail at 0.0 degrees.
Motor trust as required to trim model flight for upline and knife edge.
Mixing only 3% down elevator at low throttle for down line as I fly hands off level. And still experimenting with knife edge at about 4% down elevator for left and right rudder as model plus toward the canopy also moving CG to help this.
So my questions are
What length servo arms are people using on Rudder and Ailerons
How many degrees of deflection being used for each surface, Ailerons, Elevator, Rudder
How much expo are you using especially on rudder as this seem super sensitive.
Has anyone changed the setting in the bls servos ?? on rudder I'm running bls272.
Any help would be gratefully appreciated as read of heaps of people that loving this plane but at the moment im not feeling it.
Sorry for the long post.
Wayne
Last edited by Vigor3d.; 04-26-2020 at 05:50 PM. Reason: spelling
04-27-2020, 09:50 AM
#57

My Feedback: (2)
Hi Wayne,
Very sorry you have had all these issues. I�m still flying my original Element that I used at the Australian Masters, 2017 World Championships and to win the 2019 US F3A Nationals. My setup is as follows:
Plettenberg
D3 Controller
Futaba 171 on ailerons
Futaba 175 on rudder
Futaba 173�s on elevator
For Low rates ( normal )
9 degrees for Aileron
9 degrees for up elevator 11 for down elevator
10 degrees or so for Rudder
For snaps(my snaps are rather fast)
26 degrees of aileron
7 degrees of elevator
20 degrees of rudder
My expos are rather high and I use stiff springs as well. This isn�t specific to the Element but more to my style and how I�ve always setup airplanes for my personal feel.
My aileron servo arm is the stock large size servo wheel that comes with Futaba servos. My rudder servo arm is only a 1.5 inch Dubro HD Arm.
One thing to point out is the CG for the airplane is the rear of the wing tube. Not in front of the wing tube or 1/4 inch behind the wing tube.
The yaw instability that you are referring to I would have to say is possibly due to the soft mounting on the OS Motor. (Just my thoughts) I would try hard mounting the OS motor.
04-27-2020, 07:15 PM
#58
My Feedback: (1)
Hi Everyone
This is my first post here so please be easy on me lol as I have some questions I am hoping you experienced pilots with the BJ Element can help me with.
I have just purchased a used Element to replace my 14 year old Oxai Infinity that was converted to electric as this has got me from Sportsman, Advanced and Expert in 2 years so was now time to upgrade the plane for the F3a class. The guy selling it was experienced and said it did not suit his flying style hence the sale. I was really happy with my purchase as it was fitted out with the OS overrun motor, 3 blade Falcon prop, Futaba Bls servos, Futaba 100a esc. I was itching to get it in the air. The first flight was terrible and were my problems began, it was tail heavy and wanted to stall way too easy CG was 1/4" behind the wing tube the top wing pointing down towards the wing. The plane would not fly a straight line and every time you exit a loop etc. it was a lottery as to which direction the plane would head off in. I added 240grams of lead in the nose and this helped tracking but did not fix the issue completely. There was so much mixing and flight conditions as I had his radio set up also that I did not know where to start to rectify this so decided to start from a blank set up. Anyway 2 weeks on I have a new set up, I have moved the rudder servo from the rear and placed in down low by the undercarriage box and run cables back to the rudder, I cut out the battery tray and moved forward and dropped it also so I can now get the batteries under the motor and I have also moved the rx battery and placed it under the esc plywood plate in the nose. So I now have the CG in front of the wing tube the plane flys better and feels more locked in, stalls great, exits spins and snaps beautifully, flares for landing with ease but I still cannot get it to exit radius manoeuvres without it heading somewhere ??? with the OS motor it has really soft silicon tube on the rear mount so I changed this for Tygon fuel tubing and this has helped a lot. It seems there is little info on the plane regarding set up and no instruction manual that I can find apart from pictures, the BJ Craft website says manual coming soon.
My set up,
Ailerons 8 degrees normal flight snap rate 10degrees 55% expo
Elevators 17degrees this was found by flying the at approx 60 degree bank and pulling ever tighter circles until plane stalled which was at the end on the tx stick travel. 30% expo
Rudder down to 55% travel and 60% expo for flying and a logic set for 100 rudder for stall turns and snaps. Rudder is so powerful compared to my old plane lol.
Wings set to 0.65 incidence, top wing the same 0.65 with tail at 0.0 degrees.
Motor trust as required to trim model flight for upline and knife edge.
Mixing only 3% down elevator at low throttle for down line as I fly hands off level. And still experimenting with knife edge at about 4% down elevator for left and right rudder as model plus toward the canopy also moving CG to help this.
So my questions are
What length servo arms are people using on Rudder and Ailerons
How many degrees of deflection being used for each surface, Ailerons, Elevator, Rudder
How much expo are you using especially on rudder as this seem super sensitive.
Has anyone changed the setting in the bls servos ?? on rudder I'm running bls272.
Any help would be gratefully appreciated as read of heaps of people that loving this plane but at the moment im not feeling it.
Sorry for the long post.
Wayne
I'm very sorry to hear about your bad experience with the Element. I think we can get it sorted pretty easy as I have helped set a few of these up and that seems to get them in the ballpark and then you can adjust until you get it exactly how you like it.
First off the incidence is critical, The model doesnt come with a zero line but it is good that you have the stab at zero for your reference. When you did this did you check the canopy deck angle? I have found this to be the easiest method. I set the model up so the canopy is set to -8 degrees. Then set the wing to .7-.8 degrees of positive and the stab will be at 0. Tcan should be at the same incidence as the wing like you mentioned.
CG on the model I found is at the rear of the wingtube to the center of the tube. I know it varies for everyones style but this should give you almost zero coupling in knife edge.
For the radius question you have, have you checked to make sure the stabs are close in line with the wing as well as the Tcan? I know some times when building these you can get one that is slightly out of alignment. Also check to make sure your Tcan is mounted securely in the fuse. I have added a former to the top of the fuse to not allow the Tcan to flex. If that doesnt do it, you may try a small subfin under the tail to clean up the air in pulls on the radius.
My throws are as follows
Ailerons 8 degrees up 8.5 down for normal flying, Snaps are 22 degrees up and 22 down.
Elevator 10 degrees up 12 degrees down
Rudder Normal flying rate is about 10-15 degrees but this is more a feel on how much to push the stick for knife edge flight.
If you have any questions please feel free to keep on asking as I want to make sure your happy with your model.
Thanks,
Andrew Jesky
04-28-2020, 01:14 AM
#59
Junior Member
Join Date: Apr 2020
Posts: 3
Likes: 0
Received 0 Likes
on
0 Posts
Wayne,
I'm very sorry to hear about your bad experience with the Element. I think we can get it sorted pretty easy as I have helped set a few of these up and that seems to get them in the ballpark and then you can adjust until you get it exactly how you like it.
First off the incidence is critical, The model doesnt come with a zero line but it is good that you have the stab at zero for your reference. When you did this did you check the canopy deck angle? I have found this to be the easiest method. I set the model up so the canopy is set to -8 degrees. Then set the wing to .7-.8 degrees of positive and the stab will be at 0. Tcan should be at the same incidence as the wing like you mentioned.
CG on the model I found is at the rear of the wingtube to the center of the tube. I know it varies for everyones style but this should give you almost zero coupling in knife edge.
For the radius question you have, have you checked to make sure the stabs are close in line with the wing as well as the Tcan? I know some times when building these you can get one that is slightly out of alignment. Also check to make sure your Tcan is mounted securely in the fuse. I have added a former to the top of the fuse to not allow the Tcan to flex. If that doesnt do it, you may try a small subfin under the tail to clean up the air in pulls on the radius.
My throws are as follows
Ailerons 8 degrees up 8.5 down for normal flying, Snaps are 22 degrees up and 22 down.
Elevator 10 degrees up 12 degrees down
Rudder Normal flying rate is about 10-15 degrees but this is more a feel on how much to push the stick for knife edge flight.
If you have any questions please feel free to keep on asking as I want to make sure your happy with your model.
Thanks,
Andrew Jesky
Thanks Andrew and ACGlenn for your replies,
I will add another former to the front of the OS motor to it from moving side to side or up and down as it currently does on the rubber mounts. I will also make a former for inside the fuz below the Tcan to add extra support. My tail is level with the wings and the Can is 238 on both sides from the tips to the aileron surface so I'm happy the plane is squared up. I'm guessing you are not worried about servo resolution with such small travel? on the rudder I'm trying to use as close as possible to 100% afr, I don't think it is remotely possible on the rudder for normal flying but I do have it change as a logic mix to 100% only for the stall turns and snaps. If I move my CG back Andrew to the wing tube will this reduce the amount of elevator I need ?? I'm using a lot more than you guys at 17 Degrees. Interesting that you unload the elevator for snaps, they must be really fast, quite a different flying style to what we do here in Australia.
Andrew I will move the incidance you mentioned from 0.65+ .7 - .8. Thanks for the reference to the canopy line I will start making the changes this week and take some photos and upload and provide some feed back to my findings.
What are your thoughts on the Falcon 3 blade 19.5 x 13 over the Falcon 2 blade 21x14 ?? The plane came with the 3 blade but I prefer the speed of the 2 blade as its always windy here in Perth.
Thanks Wayne
05-07-2020, 01:13 AM
#60
Junior Member
Join Date: Apr 2020
Posts: 3
Likes: 0
Received 0 Likes
on
0 Posts
UPDATE.
Have managed to get out flying and test some work I have done on the plane as mentioned above, I made 2 plywood braces to support the front of the motor to the side of the fuselage to stop the OS motor moving around on its rubber mounts and I also made a support for inside the fuselage under the T-cant. as this was moving around side to side. I also wrapped the T-cant in glad wrap and used silicon on top of the fuselage here and sat the T-cant back on top to push any excess out allowing any left to fill gaps and take the shape of the gap as the T=can't was lifted at the front to get the correct incidence matching the wing. After drying and trimming with a sharp knife I have to say it has greatly increased the rigidity and the T-cant does not move now. So i flew and re adjusted the side motor trust also used some of Andrews radio and model set up on a new model memory and wow what different model, I flies so much better. The snaps are awesome and locked in, the elevator I'm still working on its a bit soft for me so changing set up here slowly to find the balance, rudder is now more predictable and I think now any deviation of coarse is me accidentally inputting rudder while increasing the throttle ( Mode 2 ) I might try servo slow feature here see if that works. I also tensioned up the TX springs as much as possible which also helped. Second day flying was blowing an absolute gale but flew anyway wind was 90 degrees to the runway so made for an interesting day and learning wind correction with this plane but did exactly what it was supposed to do. My next change will be change to a Falcon 2 blade 21x 14 from the 3 blade 19.5 x 13 the came came with as I think its a bit hard on the Hacker 20c batteries. Im now starting to like this plane after a bad start, will update in a week a two when I finally have it dialled in.
Cheers Wayne
12-17-2020, 04:12 PM
#62
I bought an Element off a top pilot. His setup was different from Andrew's recommendations above. So, I set up the Element as per Andrew's figures and flew it today. I had an Agenda that I'd flown for 3 years with a CRS Contra. I moved that across to the Element.
I was amazed to find that the only changes I had to make to get the Element to fly straight and level were 4 clicks on the elevator and 1 click on the rudder! In KE there was no coupling in either KE although I will need to recheck on a less windy day. The CG position means I only need a smidge of down elevator when inverted. Would like to know from Andrew if that is what he would expect with the CG on the rear of the wing tube.
I was pleased to see that both upright and inverted spins were fine without any aileron added. I prefer the slow spin rate as it gives more time to stop it on the money. I need to add in a smidge of up thrust but the side thrust appears to be spot on - zero for a contra of course.
Very pleased with the Element even though I've only had 2 flights so far. It flies like my Agenda (only to be expected) while it seems not to have any control coupling in KE. Still need to check if just applying rudder when S&L will cause a bit of coupling but I'm hoping that if there is any it will be much less than in the Agenda.
12-18-2020, 09:05 AM
#63
My Feedback: (1)
Sounds like you are very close on the Element with only a few flights on it. As far as CG goes I do think you are very close, I have a slight push when inverted. If you feel like you'd want to to have a little more push on the inverted you can move your CG forward some and increase the wing incidence some. One thing to note on your element did you add the wing sfg's? This will help to keep the wings stable in upright spins. If you have any questions with the model please feel free to ask and I'd be more than happy to help with it.
Andrew
Andrew
12-18-2020, 03:32 PM
#64
Andrew, many thanks for your speedy reply. Yes, the previous owner fitted the wing fences. He also tried the tail fences but felt they contributed little so removed them. The aircraft certainly seems to spin upright and inverted in a normal fashion. Hope to get out and fly again early next week. Have added a slight amount of up thrust to counter the slight dive when full power is selected during level flight. Will see if that affects the up line which looked pretty good on the first outing. I had the same snap set up as on the Agenda forgetting that the Element has bigger ailerons so the snap was extremely fast! Have reduced the aileron throws and will see how that feels. I'll post once I've flown again.
Peter
Peter
12-19-2020, 03:35 PM
#65
Andrew, I have a tame Aeronautical Engineer Professor who has taken up the challenge to explain the theory behind the effect of wing fences on the aircraft's manoeuvrability. I have given him the wing geometry but apart from saying the wing section is symmetrical with a 13.3% thickness I know no more. Do you know if this is a recognised wing section and if so what it is?
Thanks
Peter
Thanks
Peter
12-20-2020, 04:23 PM
#66
My Feedback: (1)
Peter,
What you'll want to tell him about it is also the change of leading edge taper that happens at 3/4 distance.
What we find with the SFG out there is is keeps the air attached to the wing and allows the tip to stay flying longer. The Element in an upright spin would have a hard time coming to a stop to get it to stall as the TCAN 150 square inches was being blanketed by the fuse. When inverted the Tcan is producing more lift and the vertical fin being in the clean air also helps slow the stall speed.
Andrew
The following users liked this post:
hancis (01-01-2021)
01-14-2021, 05:31 PM
#68

My Feedback: (1)
I see that for your elevator geometry,
question for you?
Are you using a servo arm that has a short distance from the output shaft to the ball link
relative to the elevator control horn which is rather distant from the hinge line
IS the reason for doing this to:
1. decrease the travel of the elevator so as to maximize the servo resolution? that means, you have your dual rates set to 100% and only get about 10 degrees of deflection?
as this will be advantageous for many reasons, including making it very precise on the pitch direction
as well as decrease flutter
The following users liked this post:
apereira (09-11-2023)
01-15-2021, 12:09 PM
#71
My Feedback: (1)
Correct, You'll want to set your proteus bipe up with the ability to get about 20 degrees of elevator travel at 130% ATV. This is the max for the elevators, Ailerons should be set to get 25 degrees. It allows you the best mechanical advantage when deflecting the surfaces.
Andrew
Andrew
The following users liked this post:
orthobird (01-16-2021)
The following users liked this post:
orthobird (01-17-2021)
06-27-2021, 09:45 AM
#75
Bem-
I did use the gear with the kit and have had no problem with them, although I do know several people in my area who have swapped the gear out for the reasons you mention. It's probably a good idea and I may do the same at some point.
I did not use stab adjusters. The plane is set up assuming the stab is at zero degrees and adjusting everything to that reference. I found the challenge to be leveling and setting the incidence of the canalyzer. In the first flights the aircraft was carrying some aileron and I gradually have adjusted that out with the wing adjusters.
I'm using a Neu F3A motor (straight gear) and it's required lube cycle is about 50 flights, FWIW.
-Ron