


Welcome to Club SAITO !

 04-25-2019, 04:30 AM
Re marking engine mounting bolts: For plastic mounts I use thin double sided tape to hold the engine in position and use a perfect sized drill to mark. I grind a point on the shank end of the drill, heat the point and melt perfect dimples into the mounts (all four at once). I finish the holes on a drill press. I fly 60 size or smaller planes and have never used an aluminum mount but the great planes tool does look handy for that.
 04-25-2019, 04:36 AM


Well as far as mounting an engine I get the engine we�re i want it and then I take a long drill bit drill one hole put in screw then drill the next and so on. Or I will mark with the Great Planes tool then drill holes in plane. Or if by some chance I use an aluminum mount
i well mark and then drill tap and repeat.
So old subject on pullers got a three jaw puller last night and were has that tool been all my life works awesome.
i well mark and then drill tap and repeat.
So old subject on pullers got a three jaw puller last night and were has that tool been all my life works awesome.
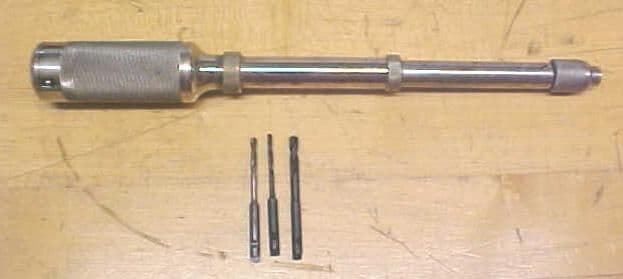
I have made drill jigs for most of my favorite engines. Just clamp one in place and drill. Otherwise simply lay out by actual numbers , fIts every time.
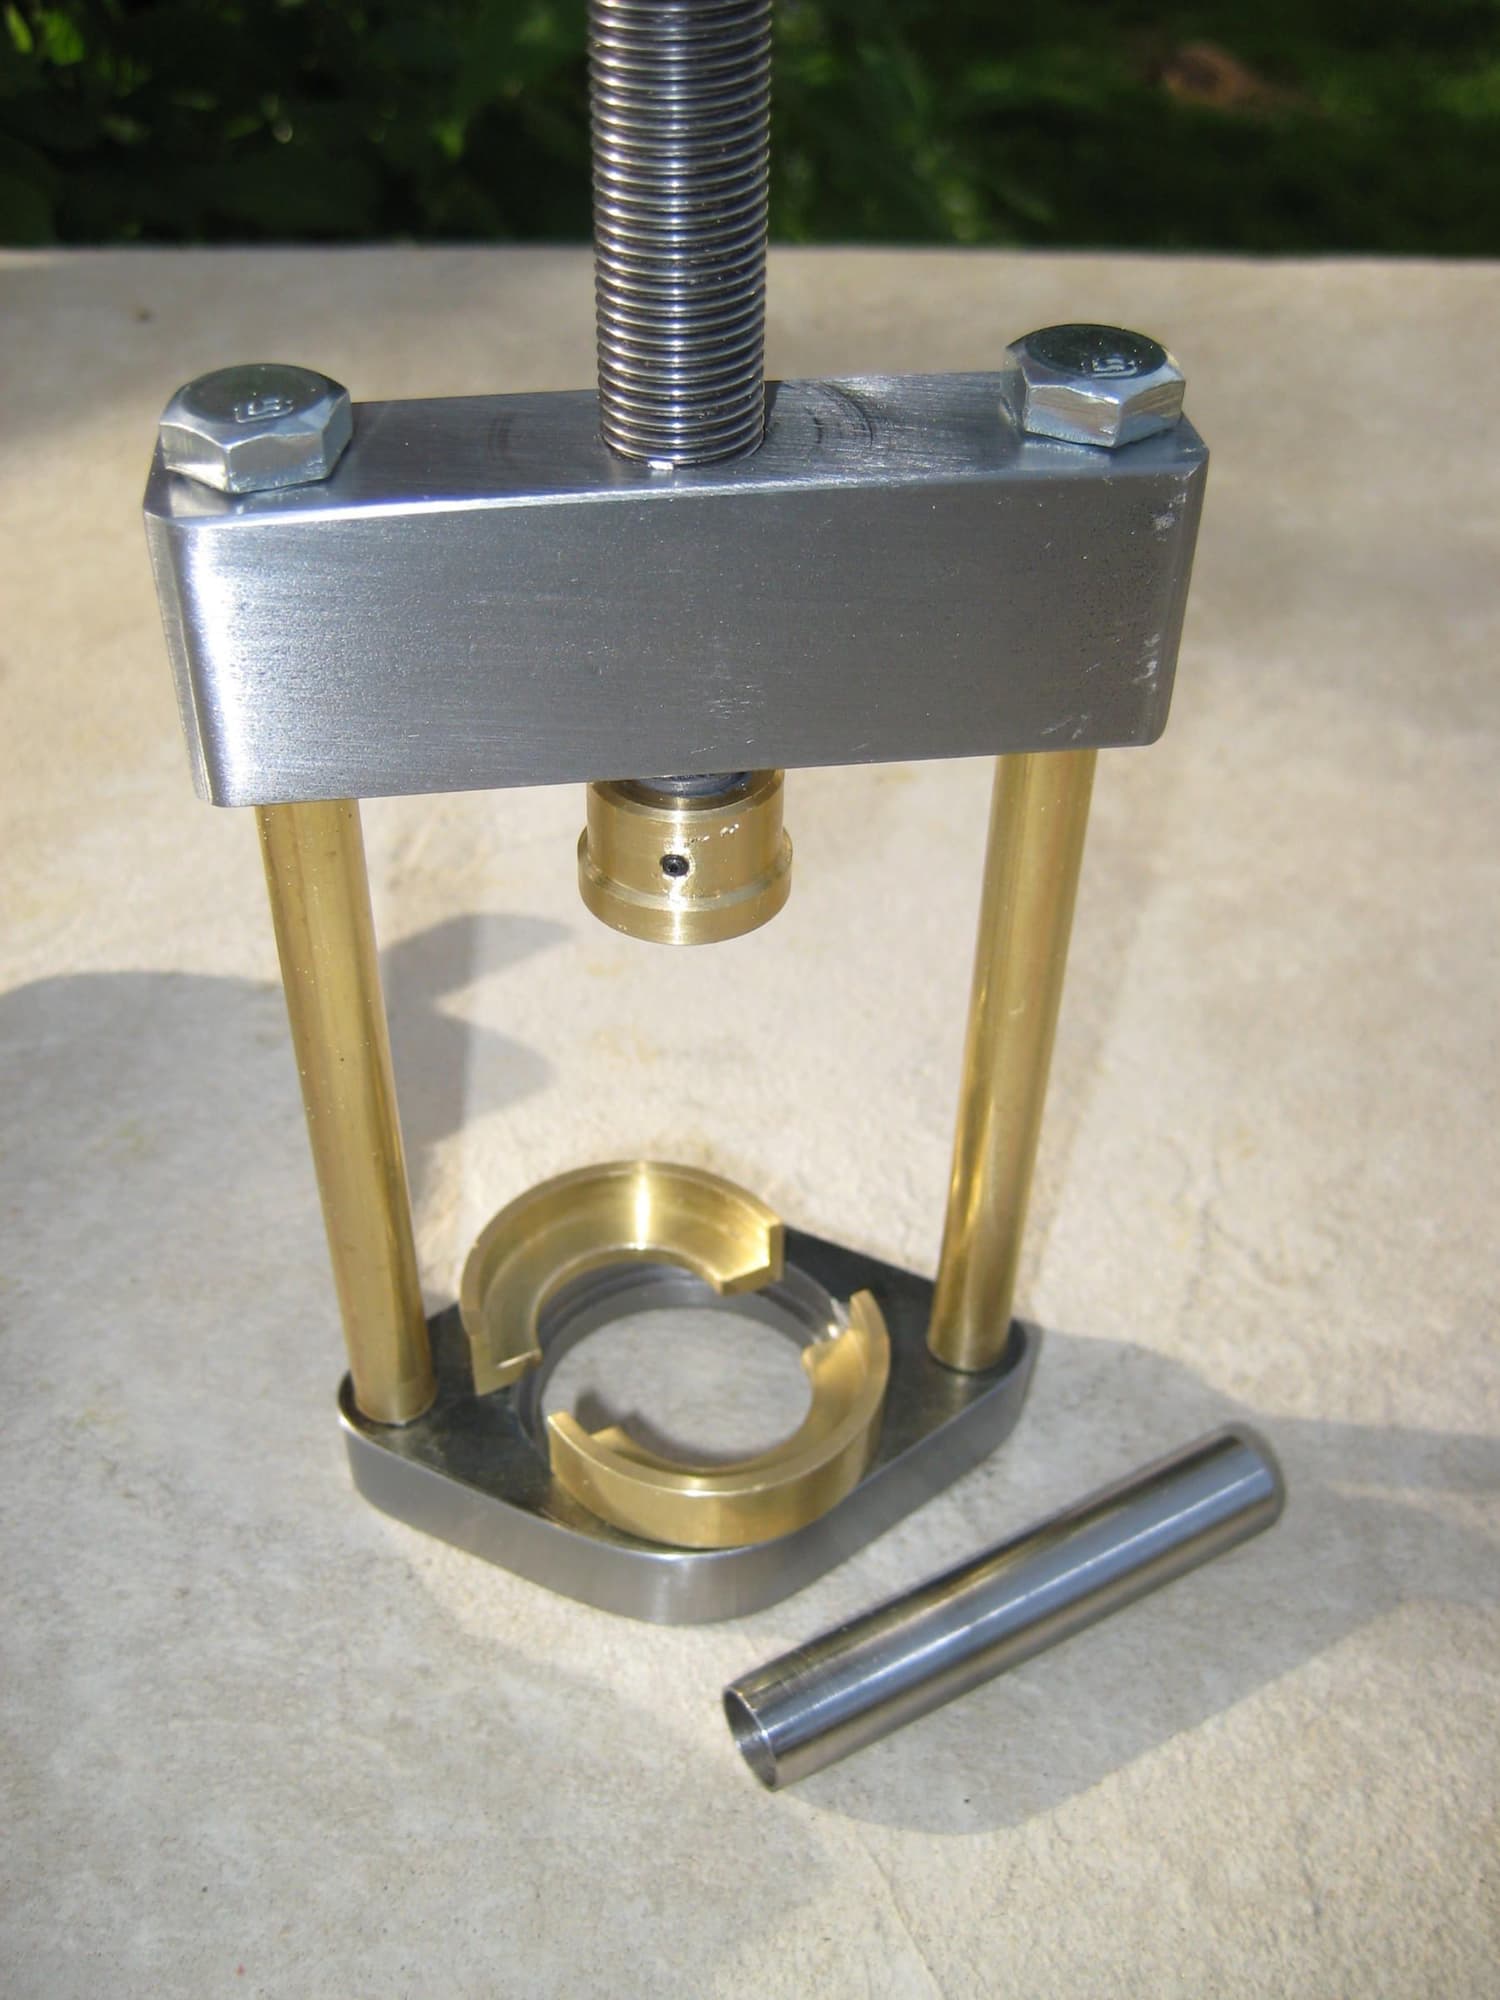
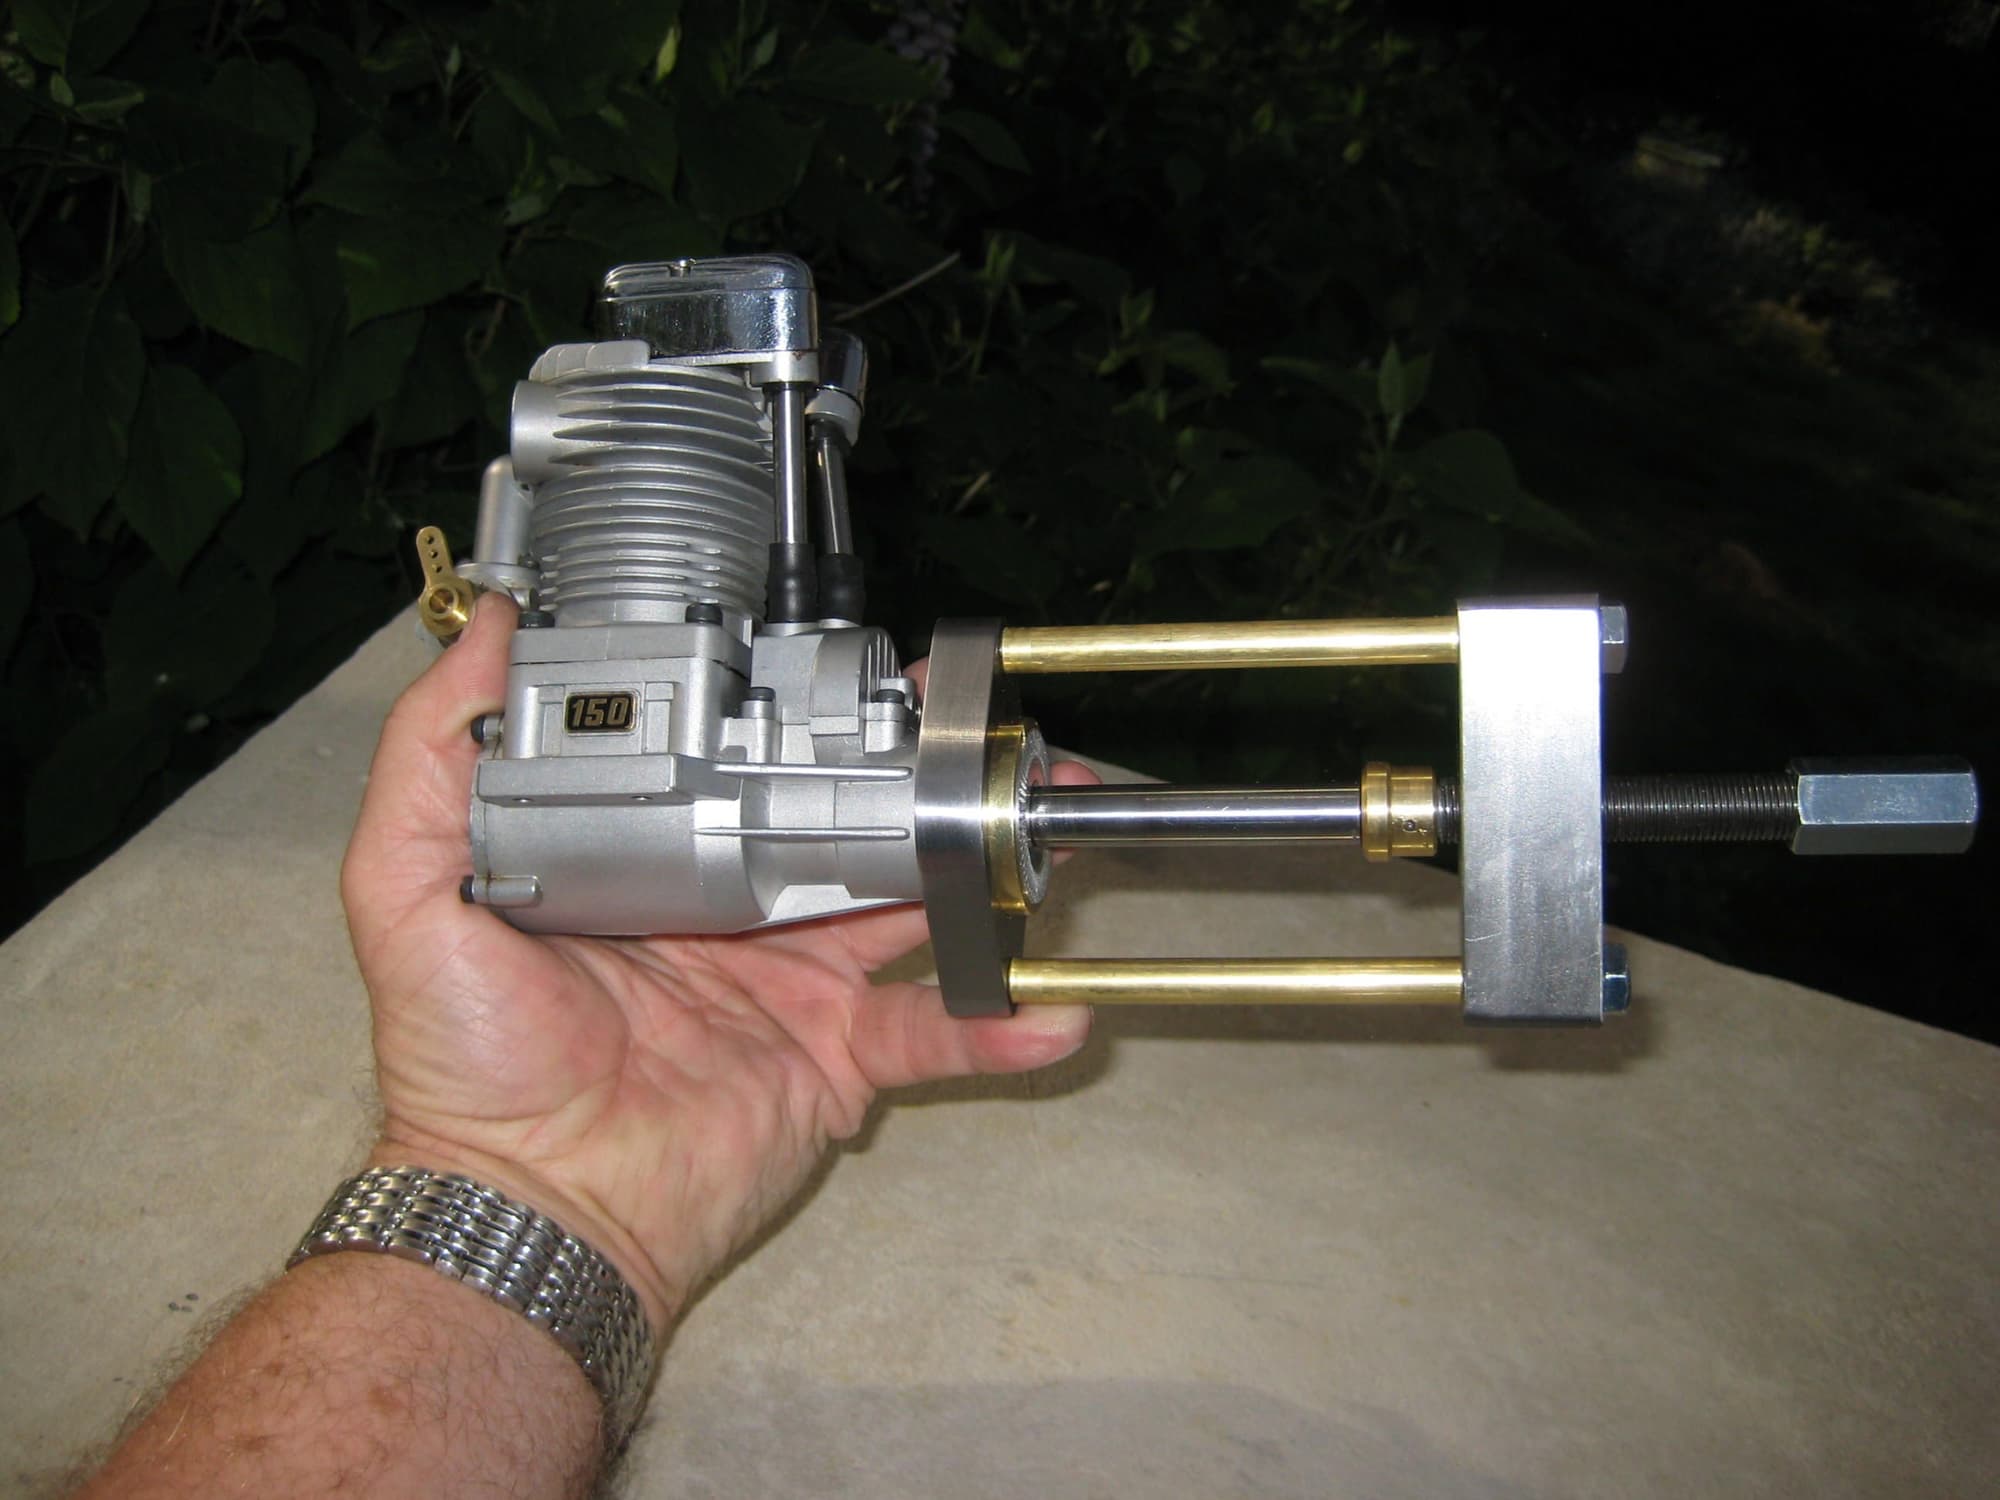
Three jaw pullers were among the first to find their way into my tool box when I got started over 50 years ago . Had all kinds and sizes since. For engine hubs I made a dedicated puller to make full contact with no pressure points on the hub. Rather than push on the crank nose this puller uses a sleeve to push directly on the tapered inner collet. Cost a lot less too()
Didn't even cost $7
Last edited by Jesse Open; 04-25-2019 at 04:43 AM.
04-25-2019, 04:40 AM
I have made drill jigs for most of my favorite engines. Just clamp one in place and drill. Otherwise simply lay out by actual numbers , fIts every time.
Three jaw pullers were among the first to find their way into my tool box when I got started over 50 years ago . Had all kinds and sizes since. For engine hubs I made a dedicated puller to make full contact with no pressure points on the hub. Rather than push on the crank nose this puller uses a sleeve to push directly on the tapered inner collet. Cost a lot less too()
Didn't even cost $7
04-25-2019, 04:58 AM

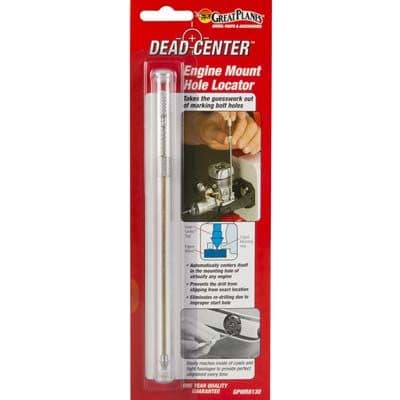
Great minds thinking alike Hobbsy! In case you want to know what we are talking about here is a photo and a link. It will be the best couple of bucks you spend.
https://www.towerhobbies.com/cgi-bin...p?I=LXK378&P=7
https://www.towerhobbies.com/cgi-bin...p?I=LXK378&P=7
04-25-2019, 05:14 AM

My Feedback: (102)

Join Date: Dec 2001
Location: Colonial Beach, VA
Posts: 20,370
Likes: 0
Received 25 Likes
on
25 Posts
 In my case we thought alike four times, I actually wore one out. I do like Pete and use socket head self starting screws a lot. From 62 on down I should add, I haven't tried it on a large engine yet. When I started out 63 years ago I used my Dad's Yankee Drill on an F-86 Sabre Jet U control plane with a McCoy 36 for power.
Last edited by Hobbsy; 04-25-2019 at 05:18 AM. Reason: Add content
04-25-2019, 05:35 AM
Still have my dad's old Yankee drill from over 60 years ago. He passed it along to me when I first started in Skilled Trades with. Don't use it for engine mounting. I like to get those holes straight and true. The use of very close fitting screws requires spot on holes drilled squarely into the mount. A good center drill comes in handy for precision hole drilling.
 04-25-2019, 05:46 AM
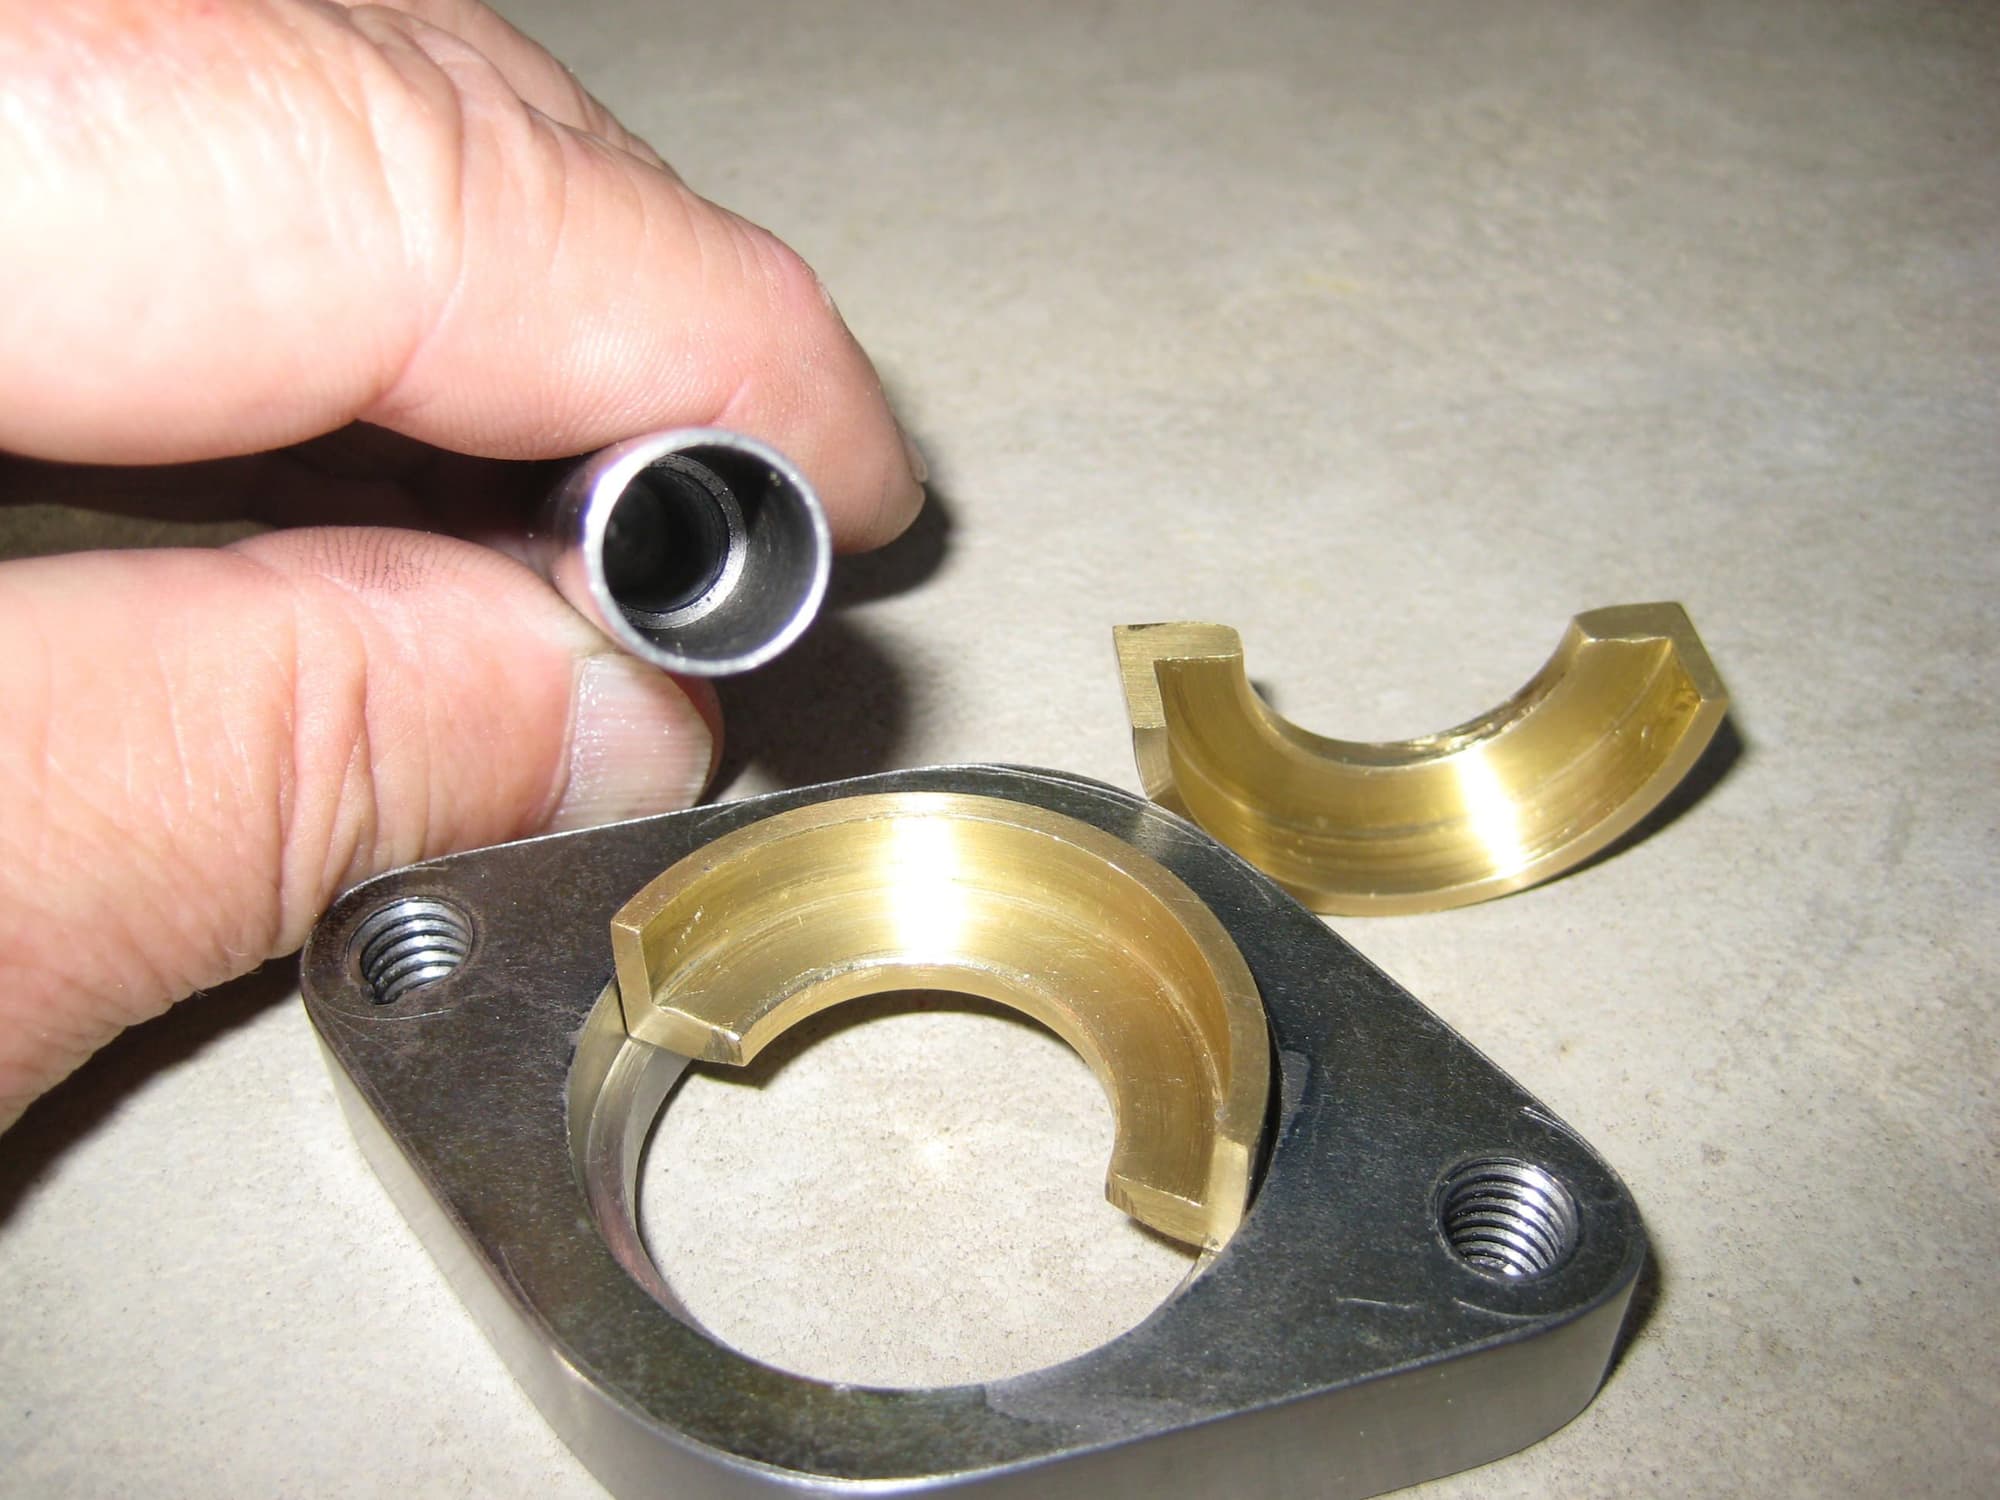
I use mostly home made aluminum mounts but at times use plastics.
These brass tapping plates take the place of individual machine nuts.
They help spread the load well and hold very securely. They really make the plastic mounts a lot stronger and make a broken lug in a crash far less likely
Pretty easy to make as well.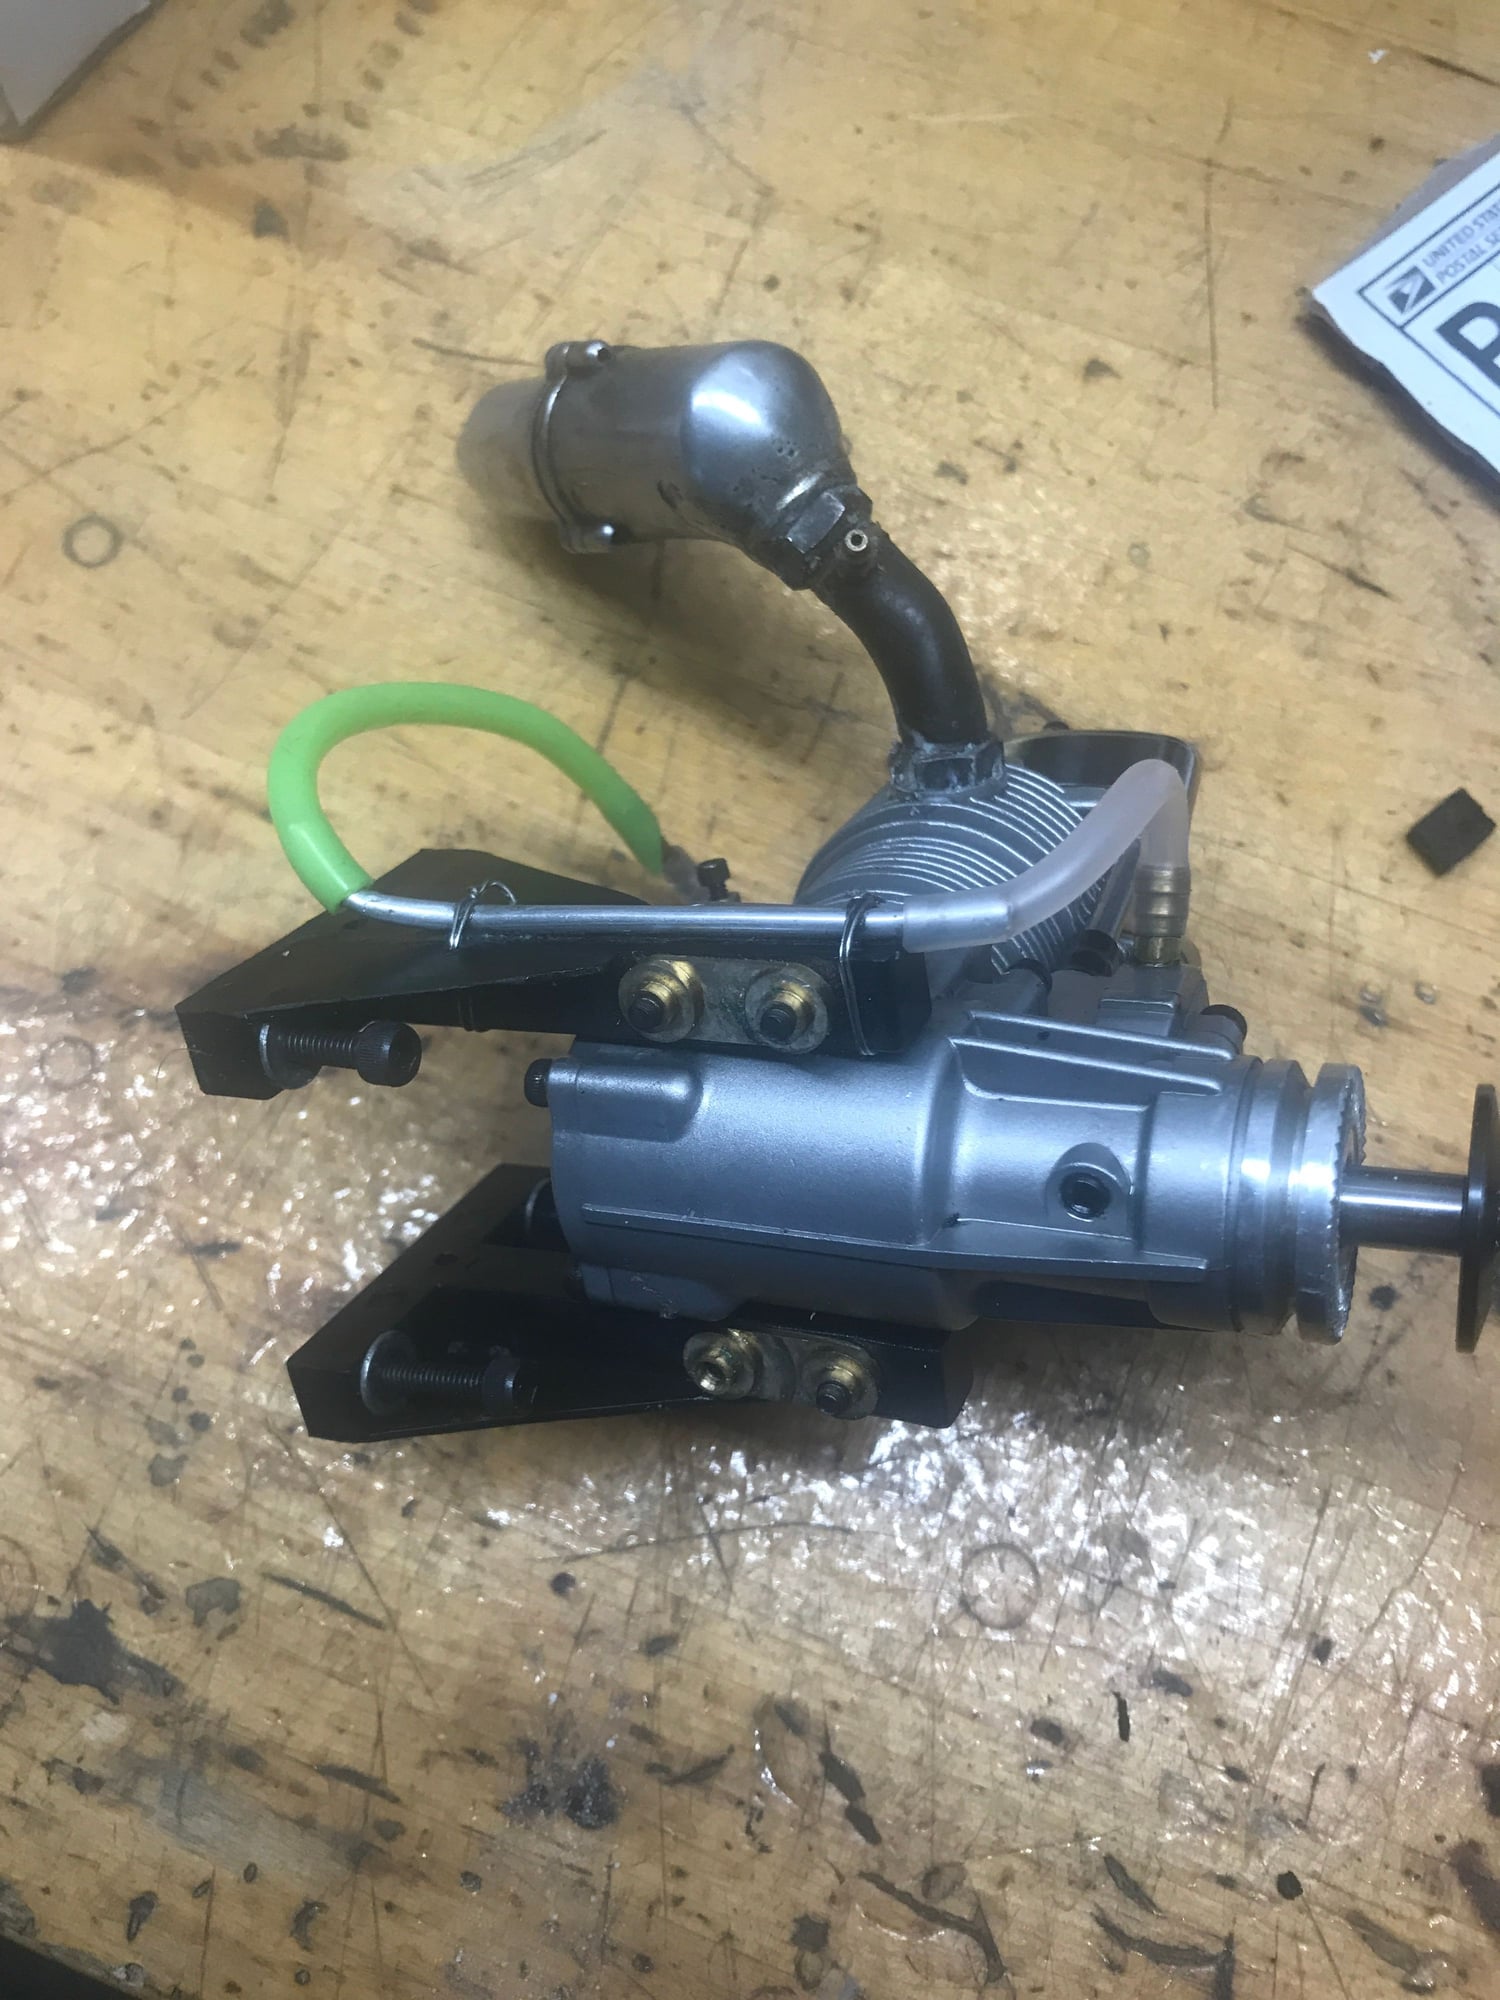
These brass tapping plates take the place of individual machine nuts.
They help spread the load well and hold very securely. They really make the plastic mounts a lot stronger and make a broken lug in a crash far less likely
Pretty easy to make as well.
04-25-2019, 05:56 AM
I like to drill then tap for socket head screws and add a washer and locking nut on the bottom. Probably overkill but I haven't had a engine work loose.
04-25-2019, 06:05 AM
I drill, tap and blue Loctite. Engines don't work loose, lighter than longer screws and hardware. But then again I'm running smaller engines than many of you.
04-25-2019, 06:11 AM
Whatever works. In actuality the nuts and washers should work well, Nylock if you want to add insurance. In plastics, smooth bores are preferred as tapped holes leave a load of fracture points. The tapping plates cannot spin off and they do add a bit of crash protection for the lugs.
Hopefully nobody ever loses an engine;$
Jim, your method sounds fine! A lathe turned transfer punch and a true hole made in a drill press are well accepted shop methods. The mill and lathe are two of the most valuable tools in the shop! They open the doors for many new ideas and methods. Once you have them, you sure won't care to go back!
04-25-2019, 06:48 AM
Whatever works. In actuality the nuts and washers should work well, Nylock if you want to add insurance. In plastics, smooth bores are preferred as tapped holes leave a load of fracture points. The tapping plates cannot spin off and they do add a bit of crash protection for the lugs.
Hopefully nobody ever loses an engine;$
Jim, your method sounds fine! A lathe turned transfer punch and a true hole made in a drill press are well accepted shop methods. The mill and lathe are two of the most valuable tools in the shop! They open the doors for many new ideas and methods. Once you have them, you sure won't care to go back!
Hopefully nobody ever loses an engine;$
Jim, your method sounds fine! A lathe turned transfer punch and a true hole made in a drill press are well accepted shop methods. The mill and lathe are two of the most valuable tools in the shop! They open the doors for many new ideas and methods. Once you have them, you sure won't care to go back!
Every one of those mounts have a tapered bottom on the rails. I guess I just assumed they were intended to be tapped.
Last edited by Glowgeek; 04-25-2019 at 06:51 AM.
04-25-2019, 07:00 AM
Same here. Then I take it off the plane and use the drill press to make sure they are perpendicular to the flat.
04-25-2019, 07:07 AM
Perhaps I should rethink my mounting strategy? I've tapped the holes and used blue loctite since the beginning (about 5 yrs. ago). I've reused motor mounts from quite a few crashed planes, all fiber reinforced black plastic and so far no problems. Maybe there are some stress risers lurking about!!!
Every one of those mounts have a tapered bottom on the rails. I guess I just assumed they were intended to be tapped.
Every one of those mounts have a tapered bottom on the rails. I guess I just assumed they were intended to be tapped.

Just a detail that can tip the scales the right way at times. We have all seen engines with broken lugs. I have welded quite a few and replaced them too.
Tying them together can make the difference and the weight gain is very small.
04-25-2019, 08:25 AM
My Feedback: (1)
Jim
Saito Engines, there is no substitute
04-25-2019, 08:51 AM
Great Planes makes a grooving tool I find handy you might check out. Tower was showing the Dead Center was in sock so you can order it from them or your LHS if you have one.
04-25-2019, 08:51 AM
My Feedback: (1)
Well as far as mounting an engine I get the engine we’re i want it and then I take a long drill bit drill one hole put in screw then drill the next and so on. Or I will mark with the Great Planes tool then drill holes in plane. Or if by some chance I use an aluminum mount
i well mark and then drill tap and repeat.
So old subject on pullers got a three jaw puller last night and were has that tool been all my life works awesome.
i well mark and then drill tap and repeat.
So old subject on pullers got a three jaw puller last night and were has that tool been all my life works awesome.
when I complained to them about the problems I had with these 2 World Models plane they said if I buy another plane they will give me their highest discount, but no-p, never again will I buy another, you should see the ripple in the Mustang's cowl
Jim
Last edited by the Wasp; 04-25-2019 at 08:54 AM.
04-25-2019, 09:23 AM
My Feedback: (1)
just a engine mounting note here,
I did have a plane whereby it's manual did inform not to tap it's plastic engine mount because the threads in the plastic could weaken the mount and come to crack the plastic from vibration,
on another note, I did buy a used plane and engine once that had a few gallons run threw it, I too put a couple gallons threw it's engine only to find there was no nuts holding the engine to it's mount, the bolts were rather tight in their holes, tight enough so I could not push or pull them out, yet there was no threads in the holes
Jim
04-25-2019, 10:04 AM
Perhaps I should rethink my mounting strategy? I've tapped the holes and used blue loctite since the beginning (about 5 yrs. ago). I've reused motor mounts from quite a few crashed planes, all fiber reinforced black plastic and so far no problems. Maybe there are some stress risers lurking about!!!
Every one of those mounts have a tapered bottom on the rails. I guess I just assumed they were intended to be tapped.
Every one of those mounts have a tapered bottom on the rails. I guess I just assumed they were intended to be tapped.
But I can see this place is a waste of very good time which is in short supply, so good bye.
Take it away St David